Table of Contents
ToggleWe all are well know with OpenAI company by their world changing products like ChatGPT, Whisper and a recently launched product called SORA, which is a text to video AI model only available to few people as of now. In this blog we will discuss about how to get ChatGPT API key, how to use ChatGPT API key with python and ChatGPT API alternatives.
What is ChatGPT API ?
Chat GPT is a abbreviation of Chat Generative Pre-Trained Transformer Abbreviation. It is a conversational AI which uses a large language model (LLM) . In layman language, ChatGPT is a chatbot application from OpenAI that talks like a person using techniques of natural language processing and LLM. It has a considerable amount of applicability like debugging code, generating summaries of documents, solving mathematical programs, language translation etc.
Now that we know ChatGPT, let’s move to the API part. API stands for Application program interface. Which helps to talk to the application. ChatGPT API provides a way for developers to connect their own programs to ChatGPT.
How to get ChatGPT api key ?
We have to follow the below steps for getting the ChatGPT API key.
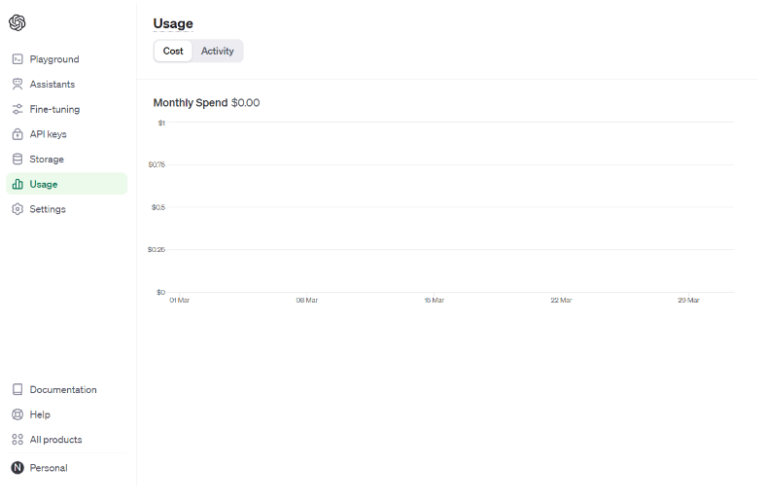
Step 1 : Visit the website given https://platform.openai.com and signup if you don’t save account and login. After logging in, you will screen like this.

Step 2 : If you are a new user, first you have to add some credit amount to your account. Which can be done by clicking on the settings tab. Once that is done we go to the billing tab. Then Click on add payment details. Fill in the necessary bank and personal details. Set the initial amount small, like 5 dollars if you are testing it.
Step 3 : Now, move to the limit section by clicking on the limit button on the left and set the hard limit and soft limit amount according to your requirement.
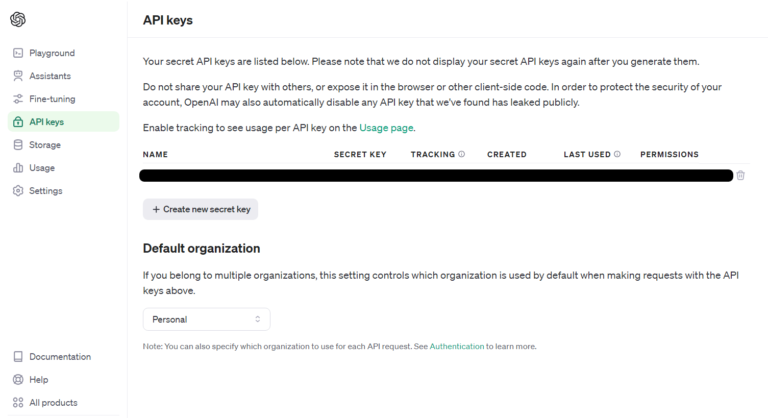
Step 4 : For generating api key, click on API Keys on the left hand side of the menu. Click on create new secret key and automatically it generates the key. Copy paste the key on a document as it is shown only once.

ChatGPT API Documentation
We should always refer to the documentation for possible updates or releases related to ChatGPT. We do recommend you to check the URL constantly. URL : https://platform.openai.com/docs/overview
ChatGPT API Pricing
Pricing of each ChatGPT model is different. You can have a look at it using the link below. URL : https://openai.com/pricing
How to use ChatGPT API with python ?
python -m venv venvi
As we have created a virtual environment, now we will activate it by following command.
venvi\Scripts\activateStep 2 : Install necessary libraries / modules We will need to install the “openai” library and two modules called “os” and “python-dotenv”. Which can be done by pasting the following code on cmd.
!pip install --upgrade openai
!pip install python-dotenv
Step 3 : Create .env file inside the current working directory and add the below line in the file.
openai_api_key="#add your chatgpt api key here”Add your api key value in the place of text above. Step 4: Creating a client object for interacting with OpenAI’s language model
from dotenv import load_dotenv
import os
from openai import OpenAI
load_dotenv()

api_key=os.getenv('openai_api_key')

if api_key is None:
   raise ValueError("OpenAI API key is not set in environment variables.")
else:
   client=OpenAI(api_key=os.getenv('openai_api_key'))
Importing necessary modules:
- Module “dotenv” helps in loading environment variables from a file.
- Module “os” makes interacting with the operating system possible including accessing environment variables.
- Module “openai” helps us connect to the OpenAI API for language model interactions.
Step 5: Make call to ChatGPT API
completion = client.chat.completions.create(

model="gpt-3.5-turbo"
messages=[{"role": "system", "content": "You are a teacher"},
{"role": "user", "content": "give me value of x. if x+10=20"}])

result=completion.choices[0].message
print(result.content)
Making an api call to the ChatGPT model called “gpt-3.5-turbo”. Have a simple linear algebra question that is to find the value of x. The parameters the client.chat.completions.create() function takes are model name and messages. Messages parameter is a list of dictionaries representing the conversation messages.
Response from ChatGPT API call.
To find the value of x in the equation x + 10 = 20,
you would first subtract 10 from both sides of the equation:
x + 10 - 10 = 20 - 10
x = 10

Therefore, the value of x is 10.
ChatGPT API Integration with your Application
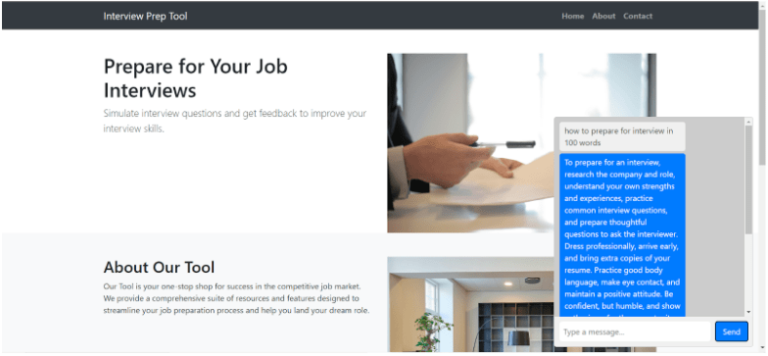
We will make a website for job interview preparation. Inside that we will develop a chatbot that would take user’s questions and give them answers, tips and suggestions using ChatGPT. The user can also ask questions related to resume creation etc. making it one stop solution for interview preparation.
The technology stack for developing the application will be Bootstrap, CSS, Javascript and python. We will use the flask framework for developing the application.
The user interface looks like this.

Folder structure of project.
<!DOCTYPE html>
<html lang="en">
<head>
<meta charset="UTF-8">
<meta name="viewport" content="width=device-width, initial-scale=1.0">
<title>Job Interview Preparation Tool</title>
<link rel="stylesheet" href="https://stackpath.bootstrapcdn.com/bootstrap/4.5.2/css/bootstrap.min.css">
<style>
.chat-container {
width: 400px;
margin: 20px auto;
border: 1px solid #ccc;
border-radius: 5px;
overflow: hidden;
position: fixed;
top: 30%;
left: 73%;
z-index: 3;
}
.chat-box {
height: 400px;
overflow-y: auto;
padding: 10px;
}
.user-message {
background-color: #f0f0f0;
color: #333;
padding: 5px 10px;
border-radius: 5px;
margin-bottom: 5px;
max-width: 70%;
}
.bot-message {
background-color: #007bff;
color: #fff;
padding: 5px 10px;
border-radius: 5px;
margin-bottom: 5px;
max-width: 70%;
align-self: flex-end;
}
.input-container {
display: flex;
padding: 10px;
background-color: #f0f0f0;
}
.input-container input {
flex: 1;
padding: 8px;
border: none;
border-radius: 5px;
}
.input-container button {
padding: 8px 15px;
background-color: #007bff;
color: #fff;
border: none;
border-radius: 5px;
cursor: pointer;
margin-left: 10px;
}
</style>
</head>
<body>
<div class="chat-container" style="background-color: #ccc;">
<div class="chat-box" id="chat-box"></div>
<div class="input-container">
<input type="text" id="user-input" placeholder="Type a message...">
<button onclick="sendMessage()">Send</button>
</div>
</div>
<!-- Navigation Bar -->
<nav class="navbar navbar-expand-lg navbar-dark bg-dark">
<div class="container">
<a class="navbar-brand" href="#">Interview Prep Tool</a>
<button class="navbar-toggler" type="button" data-toggle="collapse" data-target="#navbarNav" aria-controls="navbarNav" aria-expanded="false" aria-label="Toggle navigation">
<span class="navbar-toggler-icon"></span>
</button>
<div class="collapse navbar-collapse" id="navbarNav">
<ul class="navbar-nav ml-auto">
<li class="nav-item">
<b><a class="nav-link" href="#">Home</a></b>
</li>
<li class="nav-item">
<b> <a class="nav-link" href="#">About</a></b>
</li>
<li class="nav-item">
<b><a class="nav-link" href="#">Contact</a></b>
</li>
</ul>
</div>
</div>
</nav>
<!-- Main Content Section -->
<div class="container mt-5">
<div class="row">
<div class="col-md-6">
<h1>Prepare for Your Job Interviews</h1>
<p class="lead">Simulate interview questions and get feedback to improve your interview skills.</p>
</div>
<div class="col-md-6">
<img src="./static/1.jpg" class="img-fluid" alt="Job Interview Image">
</div>
</div>
</div>
<!-- About Section -->
<div class="container-fluid bg-light py-5">
<div class="container">
<div class="row">
<div class="col-md-6">
<h2>About Our Tool</h2>
<p>Our Tool is your one-stop shop for success in the competitive job market. We provide a comprehensive suite
of resources and features designed to streamline your job preparation process and help you land your dream role.</p>
</div>
<div class="col-md-6">
<img src="./static/2.jpg" class="img-fluid" alt="About Image">
</div>
</div>
</div>
</div>
<!-- Contact Section -->
<div class="container-fluid bg-dark text-white py-5">
<div class="container">
<div class="row">
<div class="col-md-6">
<h2>Contact Us</h2>
<p>If you have any questions or feedback, feel free to reach out to us.</p>
<ul>
<li>Email: info@example.com</li>
<li>Phone: 123-456-7890</li>
</ul>
</div>
<div class="col-md-6">
<img src="./static/3.jpg" class="img-fluid" alt="Contact Image">
</div>
</div>
</div>
</div>
<!-- Footer Section -->
<footer class="bg-dark text-white text-center py-4 mt-5">
<div class="container">
<p>© 2024 Job Interview Prep Tool</p>
</div>
</footer>
<script>
var ans="Can't answer that";
const chatBox = document.getElementById('chat-box');
const userInput = document.getElementById('user-input');
async function sendMessage() {
const userMessage = userInput.value;
if (userMessage.trim() === '') return;
appendMessage('user', userMessage);
// Send user message to bot and receive bot's response (simulated)
const botResponse = await getBotResponse(userMessage);
setTimeout(() => {
appendMessage('bot', botResponse);
}, 500);
userInput.value = '';
}
function appendMessage(sender, message) {
const messageElement = document.createElement('div');
messageElement.classList.add(`${sender}-message`);
messageElement.textContent = message;
chatBox.appendChild(messageElement);
chatBox.scrollTop = chatBox.scrollHeight;
}
async function getBotResponse(userMessage) {
const ans = await fetchData(userMessage);
// You can implement your bot logic here. For now, just echo the user message.
return ans
}
async function fetchData(userMessage) {
const apiUrl = 'http://127.0.0.1:5000/chat';
const fullUrl = `${apiUrl}?parameter=${userMessage}`;
try {
const response = await fetch(fullUrl);
if (!response.ok) {
throw new Error('Network response was not ok');
}
const data = await response.json();
return data['res'];
} catch (error) {
console.error('There was a problem with the fetch operation:', error);
}
}
</script>
<!-- Bootstrap and JavaScript -->
<script src="https://code.jquery.com/jquery-3.5.1.slim.min.js"></script>
<script src="https://cdn.jsdelivr.net/npm/@popperjs/core@2.5.4/dist/umd/popper.min.js"></script>
<script src="https://stackpath.bootstrapcdn.com/bootstrap/4.5.2/js/bootstrap.min.js"></script>
</body>
</html>
The index.py file contains flask code for rendering index.html page and making ChatGPT API call and giving the response in the backend.
index.py
from flask import Flask, render_template,request
from dotenv import load_dotenv
import os
import json
from openai import OpenAI

load_dotenv()

api_key = os.getenv('openai_api_key')

if api_key is None:
   raise ValueError("OpenAI API key is not set in environment variables.")
else:
   client = OpenAI(
api_key=os.environ.get("CUSTOM_ENV_NAME"))

app = Flask(__name__)

@app.route('/')
def index():
    return render_template('index.html')

@app.route('/chat')
def see_chat():
   message = request.args.get('parameter', type = str)

   completion = client.chat.completions.create(
   model="gpt-3.5-turbo",
   messages=[{"role": "system", "content": "You are a teacher"},
             {"role": "user", "content": message}])


 result=completion.choices[0].message
   print(result.content)
   return {'res':result.content}

if __name__ == '__main__':
   app.run(debug=True)
The .env file contains environment variables. We have stored the ChatGPT key inside it.
.env file
openai_api_key ="add ypur api key here"
To run the application you open CMD in current working directory and type
python index.py
Companies using the ChatGPT API.
Companies like wix and stripe have used ChatGPT API inside their product for solving problems. ChatGPT was used by Stripe to better understand client business and provide the right type of support. They also used GPT-4 as a virtual assistant to answer the question about documentation. Online Fraud is a common problem for all companies. Stripe used GPT-4 for fraud detection on community platforms. If you want to further read more you can visit the link. ( https://openai.com/customer-stories/stripe ).
Another company called Wix which is a no code website builder. Its users faced a problem, They were finding it difficult to write content for their website. They used ChatGPT API for generating engaging text from just a few user inputs. Follow the link to read more. (https://openai.com/customer-stories/wix ).
There are many other companies also like Digital Green, Whoop, Typeform, Retool etc who have used ChatGPT API.
ChatGPT API Alternatives
If you are looking for alternative to ChatGPT API you options like Google Gemini API and Mistral AI API . Gemini is almost similar to ChatGPT. Gemini is a product of google. Gemini can handle tasks like content generation, solving mathematical problems, generating code etc.
Conclusion
In this blog we have provided you with the ChatGPT APi python guide. Where we’ve learned how to create a ChatGPT API Key and use it with python. Further we saw the integration of the ChatGPT API into Python applications for job interview preparation.

